Fuel level sender reinforcement
Tools needed: medium channel lock pliers, JB Weld epoxy, retrieval tool.
After a number of rallies on some rough roads, I've had four fuel level senders break off with in the tank. I suspect it's the result of the fuel slapping around in the tank while bouncing down the road, sometimes sideways, sometimes on some pretty good bumps or even little jumpy bits of road.
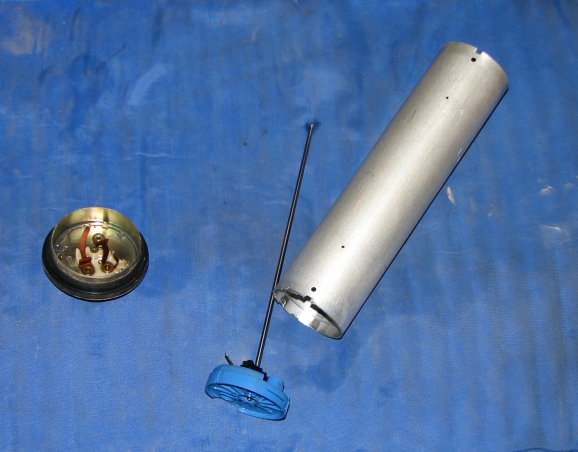
The sending unit is a tube that hangs down inside the top of the fuel tank and cannot take the stress from the fuel sloshing around. It breaks at the attachment point at the top of the tube, and the tube, inner rod, the float, and other small bits end up inside the tank. The top of the sending unit remains sealed onto the tank and the only symptom is a complete lack of movement on the dash fuel gauge.
You can buy new units from Saab or other vendors such as eEuroparts. After buying a new one and promptly breaking it two weeks later I prefer to get used senders out of cars at the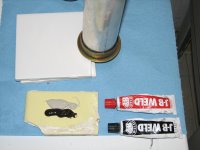 junkyard.
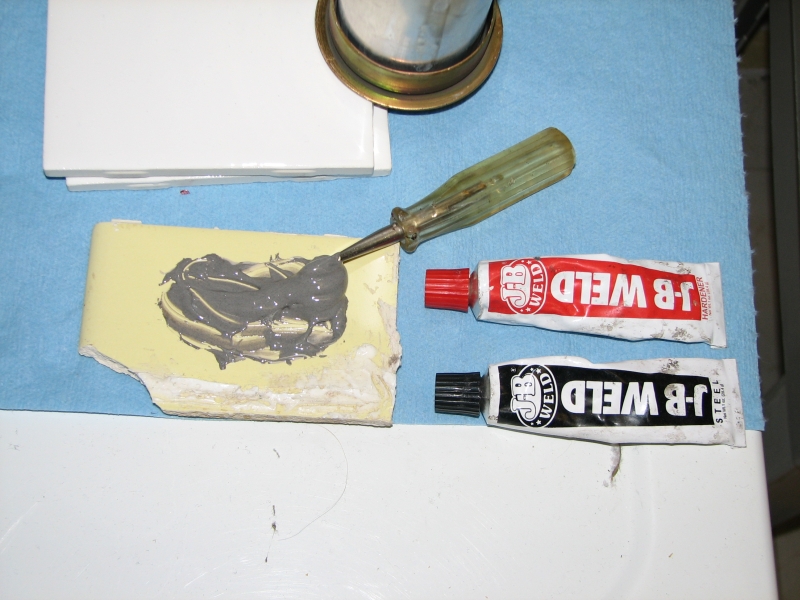
Wherever you get your sender, you'll want to make it better and stronger and faster. Well maybe not faster but certainly stronger. JB Weld will not dissolve in the presence of gasoline and is a good choice for strengthening the bond between the tube and the top of the sender. You've got JB Weld in your tool kit, right? It's just under duct tape and baling wire in the list of Extremely Important Basic Tools.
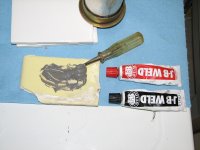
A couple of one inch stripes of each tube is plenty. Mix it well, then massage it into the gap between the brass colored top and the aluminum tube. I use a cruddy old screwdriver which will clean up ok before the stuff cures. I suggest not putting it around the entire circumference of the tube -- leave a few sections clear to allow for fuel and vapor passage. Try not to get any excess on the brass colored top as it may affect the seal and cause leaks or fuel smell in the car. Wipe off any excess and prop it up so that it's upside down and give it plenty of time to cure. I leave it for 24 hours. Once the epoxy is cured, you're ready to install your new and improved sender.
Getting to the fuel level sender is fairly simple in the classic 900 hatchback. First pull up the spare tire hatch and remove it. Depending on the model you'll either need to disconnect the rubber hinges or remove some screws. Next the larger piece of carpet-covered plywood needs to be removed. In my '85, this just pulls straight back and up. On newer models you'll need to remove a couple of screws. Either way make sure you don't pull straight up, as the clips under the plywood will bend and/or break. Pull back about 3-4 inches and then it'll come right out.
Now you'll see two covers in the hatch floor. The larger one on the left is the fuel pump cover. You don't need to mess with that, but this is a good time to check that it's firmly sealed. If you have fuel smell in the car, esp. after a fillup, a loose cover here may be the problem. If there's fuel sitting on top of the pump, it's possible that the pump and/or pump seal is bad. Re-seat the cover for the fuel pump access - it just presses on. Check it again -- it's kind of tricky to seat it properly.
The smaller rubber-booted cover on the right is the access for the fuel level sender. This is a good time to disconnect the negative terminal of the car's battery. You do not want any possibility of a spark in your work area because you will be looking inside the open fuel tank. Putting out your cigar at this point is a Good Idea.
Disconnect the plug from the top of the fuel sender. There are different models for different years -- on the '85 it's a three prong connection in a square configuration. Older models have the plug in an arc with three wires. Newer ones have a different connector. To give yourself a little extra room, you can disconect the connection to the fuel pump that is also accessed in this area. Move the wires out of the way.
The sender is secured to the tank by a plastic ring that screws down over the top of it. Kind of like the old mason jars the ancients used to preserve fruits or veggies (I do miss those). It will most likely be very tight and impossible to get loose by hand. I use a medium channel lock pliers to move it around in small increments. If it's really stuck, you can grip the lock ring in the pliers and tap it around with a hammer. Once you get it started it should come off pretty easily. There's a special Saab tool to remove these of course but I've only seen the blurry picture of one in the Bentley manual.
Remove the lock ring and you should now be able to pull up the top of the old broken sender. Don't throw it away yet -- there's a rubber gasket you'll need to pull off it if you forgot to get a new one. Check the seal and make sure it's not all grody. Or grotty.
Now is the fun fuel fishing part of the project. Getting the old tube, bottom and rod out of the tank is your goal. Leaving them in the tank probably won't cause a problem but the odds of an odd sound from them rattling inside the tank are enough to make this step worthwhile. If you're wearing chainmail or any other spark-inducing clothing now is a good time to change. No power tools, butane torches, or similar should be used because going kaboom would be bad. My favorite fishing tool is a parts retriever that is about three feet long and has a plunger that activates a claw on the end. This is a vital shop tool and well worth the price when you need it. Great for fishing wiring under carpet, through firewalls, and grabbing dropped bolts from inconvenient places in the engine bay, it also works well for grabbing your friend's french fries from a distance as well as to get the old fuel level sender pieces out of the tank. Make sure it's clean before you go sloshing it around in your precious petrol.
A coat hanger will work as well and adds an additional element of challenge.
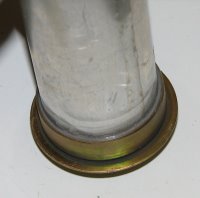
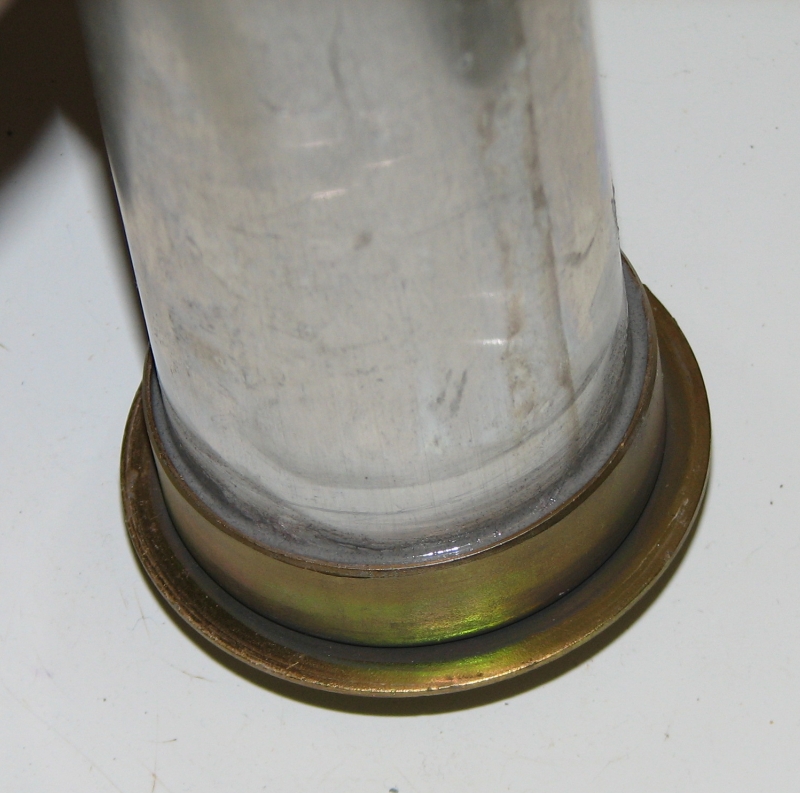
Once you have the bits out, you'll see that the weak point of the unit is close to the top, where the aluminum tube attaches to the brass-colored section. The whole thing is held together with that wimpy rod and some crimps at the top. Fortunately we have the augmented sender to replace the busticated one.
Install the sealing ring on the sender. Slowly insert into the tank, as it will overflow if the tank is full and it takes time for gas to fill the sender. Recall the orientation of the plug when you removed the sender and orient it so the plug is 180 degrees off so that when you tighten it it'll be in the right location for reattaching the wiring. Make sure the locking ring goes on straight. It should start screwing on easily, then make it snug. I give it a good 1/4 to 1/2 turn with the pliers before calling it good enough. Reattach the wiring for the sender. Notice that you let the top spin too much and the wires won't reach. Re-read this paragraph and try again.
Don't forget to reconnect the fuel pump connection if you disconnected it! Yes I've done this and it's challenging to start the car if the fuel pump has no power.
Soak up any spilled fuel in the depression around the sender with paper towels.
Connect the battery and turn the key to make sure the sender works -- you should see the level correctly displayed on the gauge now. I've done enough of these to learn that there are variations between senders and that sometimes a replacement will not display a full or empty tank at the same place on the gauge you got used to. Cope.
In the immortal words of repair manuals everywhere, installation is the reverse of removal, or something like that.
In one instance my replacement didn't work properly. In fact it's the one shown in these photos. You might notice (unlike me when I acquired it) that the base is slightly bent -- I think it was damaged in the car it came out of and the float inside the tube gets stuck.
I've now completed a couple of fairly brisk and rough TSD events with these reinforced senders and so far have not had them fail. As they say, Your Mileage May Vary. Good luck.
After a number of rallies on some rough roads, I've had four fuel level senders break off with
 in the tank. I suspect it's the result of the fuel slapping around in the tank while bouncing down the road, sometimes sideways, sometimes on some pretty good bumps or even little jumpy bits of road.
The sending unit is a tube that hangs down inside the top of the fuel tank and cannot take the stress from the fuel sloshing around. It breaks at the attachment point at the top of the tube, and the tube, inner rod, the float, and other small bits end up inside the tank. The top of the sending unit remains sealed onto the tank and the only symptom is a complete lack of movement on the dash fuel gauge.
You can buy new units from Saab or other vendors such as eEuroparts. After buying a new one and promptly breaking it two weeks later I prefer to get used senders out of cars at the
 junkyard.
Wherever you get your sender, you'll want to make it better and stronger and faster. Well maybe not faster but certainly stronger. JB Weld will not dissolve in the presence of gasoline and is a good choice for strengthening the bond between the tube and the top of the sender. You've got JB Weld in your tool kit, right? It's just under duct tape and baling wire in the list of Extremely Important Basic Tools.
A couple of one inch stripes of each tube is plenty. Mix it well, then massage it into the gap between the brass colored top and the aluminum tube. I use a cruddy old screwdriver which will clean up ok before the stuff cures. I suggest not putting it around the entire circumference of the tube -- leave a few sections clear to allow for fuel and vapor passage. Try not to get any excess on the brass colored top as it may affect the seal and cause leaks or fuel smell in the car. Wipe off any excess and prop it up so that it's upside down and give it plenty of time to cure. I leave it for 24 hours. Once the epoxy is cured, you're ready to install your new and improved sender.
Getting to the fuel level sender is fairly simple in the classic 900 hatchback. First pull up the spare tire hatch and remove it. Depending on the model you'll either need to disconnect the rubber hinges or remove some screws. Next the larger piece of carpet-covered plywood needs to be removed. In my '85, this just pulls straight back and up. On newer models you'll need to remove a couple of screws. Either way make sure you don't pull straight up, as the clips under the plywood will bend and/or break. Pull back about 3-4 inches and then it'll come right out.
Now you'll see two covers in the hatch floor. The larger one on the left is the fuel pump cover. You don't need to mess with that, but this is a good time to check that it's firmly sealed. If you have fuel smell in the car, esp. after a fillup, a loose cover here may be the problem. If there's fuel sitting on top of the pump, it's possible that the pump and/or pump seal is bad. Re-seat the cover for the fuel pump access - it just presses on. Check it again -- it's kind of tricky to seat it properly.
The smaller rubber-booted cover on the right is the access for the fuel level sender. This is a good time to disconnect the negative terminal of the car's battery. You do not want any possibility of a spark in your work area because you will be looking inside the open fuel tank. Putting out your cigar at this point is a Good Idea.
Disconnect the plug from the top of the fuel sender. There are different models for different years -- on the '85 it's a three prong connection in a square configuration. Older models have the plug in an arc with three wires. Newer ones have a different connector. To give yourself a little extra room, you can disconect the connection to the fuel pump that is also accessed in this area. Move the wires out of the way.
The sender is secured to the tank by a plastic ring that screws down over the top of it. Kind of like the old mason jars the ancients used to preserve fruits or veggies (I do miss those). It will most likely be very tight and impossible to get loose by hand. I use a medium channel lock pliers to move it around in small increments. If it's really stuck, you can grip the lock ring in the pliers and tap it around with a hammer. Once you get it started it should come off pretty easily. There's a special Saab tool to remove these of course but I've only seen the blurry picture of one in the Bentley manual.
Remove the lock ring and you should now be able to pull up the top of the old broken sender. Don't throw it away yet -- there's a rubber gasket you'll need to pull off it if you forgot to get a new one. Check the seal and make sure it's not all grody. Or grotty.
Now is the fun fuel fishing part of the project. Getting the old tube, bottom and rod out of the tank is your goal. Leaving them in the tank probably won't cause a problem but the odds of an odd sound from them rattling inside the tank are enough to make this step worthwhile. If you're wearing chainmail or any other spark-inducing clothing now is a good time to change. No power tools, butane torches, or similar should be used because going kaboom would be bad. My favorite fishing tool is a parts retriever that is about three feet long and has a plunger that activates a claw on the end. This is a vital shop tool and well worth the price when you need it. Great for fishing wiring under carpet, through firewalls, and grabbing dropped bolts from inconvenient places in the engine bay, it also works well for grabbing your friend's french fries from a distance as well as to get the old fuel level sender pieces out of the tank. Make sure it's clean before you go sloshing it around in your precious petrol.
A coat hanger will work as well and adds an additional element of challenge.
Once you have the bits out, you'll see that the weak point of the unit is close to the top, where the aluminum tube attaches to the brass-colored section. The whole thing is held together with that wimpy rod and some crimps at the top. Fortunately we have the augmented sender to replace the busticated one.
Install the sealing ring on the sender. Slowly insert into the tank, as it will overflow if the tank is full and it takes time for gas to fill the sender. Recall the orientation of the plug when you removed the sender and orient it so the plug is 180 degrees off so that when you tighten it it'll be in the right location for reattaching the wiring. Make sure the locking ring goes on straight. It should start screwing on easily, then make it snug. I give it a good 1/4 to 1/2 turn with the pliers before calling it good enough. Reattach the wiring for the sender. Notice that you let the top spin too much and the wires won't reach. Re-read this paragraph and try again.
Don't forget to reconnect the fuel pump connection if you disconnected it! Yes I've done this and it's challenging to start the car if the fuel pump has no power.
Soak up any spilled fuel in the depression around the sender with paper towels.
Connect the battery and turn the key to make sure the sender works -- you should see the level correctly displayed on the gauge now. I've done enough of these to learn that there are variations between senders and that sometimes a replacement will not display a full or empty tank at the same place on the gauge you got used to. Cope.
In the immortal words of repair manuals everywhere, installation is the reverse of removal, or something like that.
In one instance my replacement didn't work properly. In fact it's the one shown in these photos. You might notice (unlike me when I acquired it) that the base is slightly bent -- I think it was damaged in the car it came out of and the float inside the tube gets stuck.
I've now completed a couple of fairly brisk and rough TSD events with these reinforced senders and so far have not had them fail. As they say, Your Mileage May Vary. Good luck.


1 Comments:
Excellent work Dan! I have an 82 turbo with the very early white plastic fuel level sender (it needs replacement but I have some spares to try), but the later ones such as the one you used the JB weld on, are the most common type. The later type has a 3-pin inline connector with large round pins and they're very hard to get! Repairing/strengthinging the metal-cased fuel level senders is definitely the way to go! Regards, Craig.
Post a Comment
Links to this post:
Create a Link
<< Home